Monday, December 22, 2014

A Merry Christmas shaker card


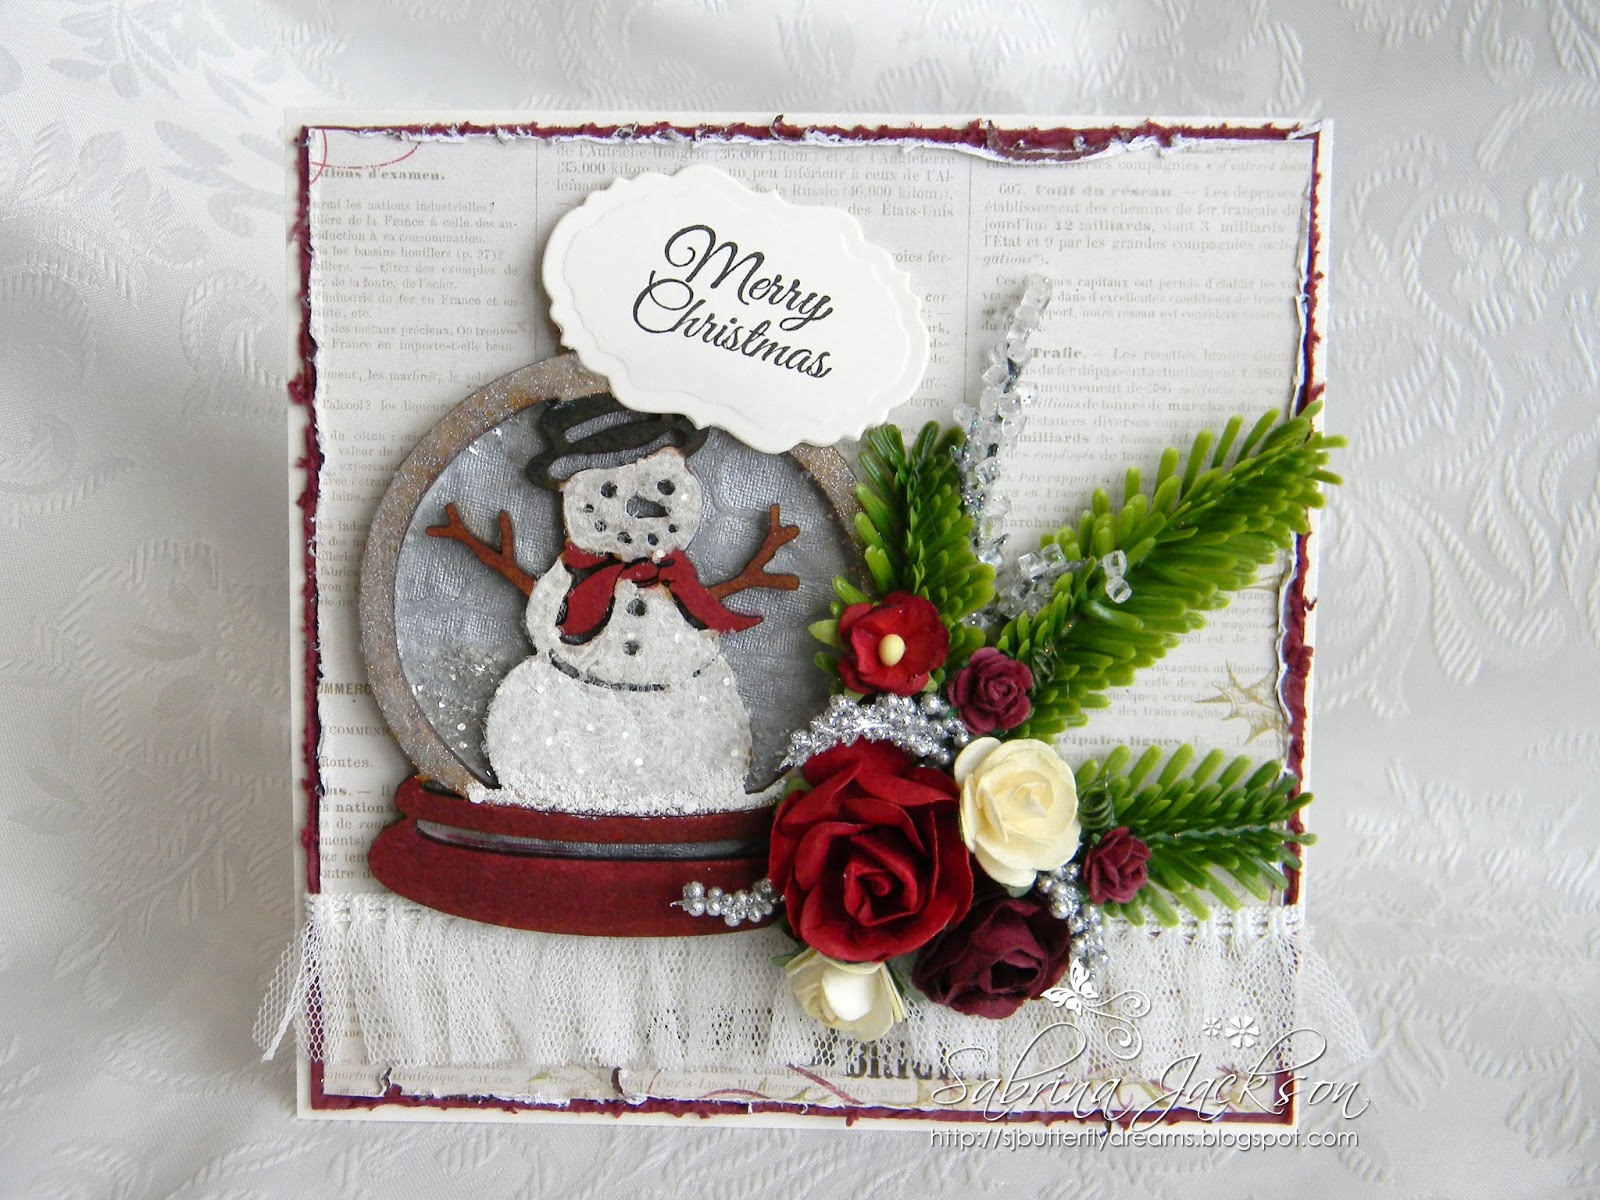
Hello and Happy Monday my sweet friends! I am coming to you with a fun little card that I made just in time for Christmas! Can you believe Christmas is almost here? Well, with the help of Unique Laser Designs, some paper, glitter and some flowers I was able to create this fun shaker card that I am about to share with you all. Shilo, sent me this Snow Globe Snowman and as soon as I saw it I knew what I wanted to do with it

Merry Christmas


Here is the web image of the before


pretty cool the way it is, but I took it to the next level by trying out how it would look colored with Copic markers.


Not bad, the wood took the marker pretty well. The next picture is after I added some silver glitter paint to keep it soft, snow globes are after all made of glass. 


Right here you can see how cool it looks after applying some white Gesso as my base


and here we are after adding some Crystal glitter.


Mr. Snowman needed a base to his snow globe that stood out a little more, so I colored it in with a dark red Copic marker.


I flipped the snow globe around, adhered some acetate so my glitter would not fall out, and to give it some volume so it actually could be a snow globe and hold glitter,  I adhered dimensional foam tape all around the perimeter of the globe part and made sure I adhered it well, so none of the glitter would fall out.


Alright, after taking the backing off the foam tape I added some silver German glass glitter and Crystal glitter. To back the globe part,  I cut a circle and adhered it to,  and by choosing silver paper it really gave it the desired look I was going for!


To finish my card off I adhered a sentiment and an arrangement of some greenery and flowers to complete my snow globe shaker card.


Here is a close up to really show off the glitter inside the globe.


Recipe:

Paper: Vintage Cream, Burgundy, DP My Minds Eye Lost&Found Christmas, silver specialty paper

ULD wood embellishment: Snow Globe Snowman

Inks: VersaFine Onyx Black, Copic markers, white Gesso, silver glitter paint

Accessories: Tulle fringe trim, Vintage Labels die (for my sentiment) , silver German glass glitter, Crystal glitter, WOC roses and sweetheart blossoms, greenery, foam tape, stamp ODBD Poinsettia Wreath

Size: 5.5" x 5.5"

Well, this is my project share for today. If you have any questions, please ask away and I will try my best to answer any questions. Thanks so much for stopping by today and checking out this fun card.

Wishing you and your family a very Merry Christmas!

Hugs,

Friday, December 19, 2014

Taking a look back at the Our Daily Bread Designs December Release

Hello and welcome on this chilly Thursday! Today I would like to invite you to have a look back with me at the Our Daily Bread Designs December 2014 release. If you have not seen this awesome release you sure are missing out. I have two projects to share with you all so let's get started. My first card uses two of the new stamps released on the 1st and the fabulous new Mini Tags

dies. Have a look at my first card

Because I care


Recipe:

Paper: Vintage Cream, Ripe Avocado, textured pink card stock, DP ODBD Blushing Rose Collection

Stamps: ODBD Admit One, Mini Tag Sentiments

Inks: Memento Rich Cocoa

Accessories:  ODBD Custom Fancy Foliage, Vintage Labels, Mini Tags, Doily Die, pink twine, pink seam binding, rhinestone, tulle and pearl pick, lace, handmade resin butterfly, WOC roses, 

Size: 5.25 " X 5.25" 


That is it for my first card! I will not prolong and jump right into my second card for today.

Again, I've used the Mini Tags dies and this time I've just used one of the Mini Tag Sentiments.... have a look

You're In My Thought


Recipe:

Paper: White, textured pink card stock, Spring Rain, Certainly Celery, DP First Edition Floral Pavilion

Stamps: ODBD Mini Tag Sentiments

Inks: VersaFine Onyx Black

Accessories: ODBD Custom Mini Tags, Fancy Foliage, tulle trim, tulle, pearl pick, rhinestone chain, flat back pearl trim, Venice lace, handmade resin butterfly, rhinestone

Size: 5" x 5"


So, here you have it, two cards created with two of the December 2014 release card, the new Mini Tags dies and some older release dies. I just love how you can mix and match and it will work and create a beautiful card. I sure hope that I was able to inspire you with my two creations. To see what the rest of the Breadsticks have come up with make sure you'll visit


Julie * Chris * Lori * Dawn * Sandee * Paula * Cathy * Wanda * Stacy  * Gracie (Guest Designer)

If you should have any problems along the way, please head on over to the ODBD Blog as this will be the first place any glitches will be fixed.


Thanks so much for stopping by to visit me today. It always means a lot to me that you take the time.
In case I do not get a chance to make another post, I wish you and your family a blessed and very Merry Christmas! May God make this Christmas very special to you and may you all remember the real reason for the season!

Have a blessed and super creative day!

Hugs,

Tuesday, December 16, 2014

May the beauty and splendor of Christmas CCC#26


Hello and welcome to our Creative Colors Challenge # 26!  I have to apologize, I am a tad bit late this morning due to technical difficulties, please forgive me. In today's challenge, which will be the last challenge for 2014,  it is all about the traditional colors of Christmas and some amazing stamps/images from DRS Designs. For my card I have chosen some sweet paper by My
 Minds Eye called Vintage Christmas, which I thought was just perfect. Have a look at my humble card

May the beauty and Splendor of Christmas


Recipe:

Paper: PTI White, Recollections Forest Green, DP My Minds Eye Vintage Christmas

Stamps/Image:  DRS Designs  Beauty of nature Christmas Greeting

Accessories: Spellbinders Flourish Trim, Fancy Tags Two, ODBD Custom dies Vintage Flourish Pattern, Fancy Foliage, Wilton doily, Martha Stewart Branch punch, WOC Sweetheart Blossoms, Mulberry roses, white poinsettia with glitter, burgundy seam binding

Size: 5.5" x 5.5"

And here is fabulous color inspiration picture


Use   Vintage Green, Deep Red, White Plus add Glitter

like I've said traditional Christmas colors and what would a Creative Colors Challenge be without a sponsor? Our sponsor for Challenge # 26 is


Oh, I hope I have sparked a little Christmas spirit in you and got you interested in joining us in this challenge.  To see what my teammates have come up with, please check out

Archana   *   Claudia   *   Kim   *   Martha   *   Tanvi   *   Tereese

Well, this is it for me for today. I hope I was able to inspire you and we are all looking forward to see your creations. DRS is sponsoring a $10 gift certificate, so check it out. You can find all of the details to the challenge and requirements on the Creative Colors Challenge Blog.

Thanks so much for stopping by today!  I pray that you and your family has a very "Merry Christmas and a Happy New Year!

Hugs,


Wednesday, December 10, 2014

A Merry Christmas Canvas

Hello and happy Hump day! Today I am sharing with you my very first post for Unique Laser Designs
I am honored to have been asked to join the team and share some of my creations with you all using these pretty cool wood embellishments.

For my first post I have a fun 8"x 8" canvas I made using the amazing "
Merry Christmas", "Snowflakes"and the "Reindeer". 


I started out tearing my Vintage music sheets up and decoupaging them unto the frame of the canvas. After that was all dried up I toned everything down with some white Gesso. 
Since I used the blue Designer paper on the very back of the canvas I wanted to bring some blue in and I used the Folk Art Ice Blue and dabbed it over the Gesso.  
After the paint was dry I added the Poinsettias, leaves and silver picks on the opposite corners for more interest. The word "Merry Christmas" was dry brushed with Gesso and then I added some silver German Glass glitter.


The Reindeer was painted with white Gesso and all glittered up with Crystal glitter and adhered to the right bottom corner. He look a tad bit plain, so I made a wreath out of tinsel trim and added a jingle bell. 
On the bottom ledge there I adhered three bottle brush trees and added the Buffalo snow. To add some more snowflakes besides the ones that are on the Designer paper, I added some glitter to the snowflakes and glued them randomly to the background and voila the Christmas canvas was done!


What do you think of my canvas?

Recipe:

Paper: K&Company Brenda Walton Christmas stack, Vintage music sheets

ULD wood embellishments:  Merry Christmas, Reindeer Snowflakes

Paints: Folk Art #2588 Ice Blue, white Gesso

Accessories: silver flower picks, Petaloo Poinsettias in white, white leaves, German Glass glitter in silver, Crystal glitter, Buffalo Snow, Tinsel trim, silver jingle bell, Bottle brush trees


 I hope that I was able to inspire you and showed you a way to think outside the box in  using these wonderful wood elements.

Well, this is it for me for today, thanks so much for allowing to share my creation with you all. I am looking forward to sharing more of my creations with you all using Unique Laser Designs wood elements!

For all of the amazing items available at Unique Laser Designs, make sure that you check out the 
store!

Have a crafty day!


Hugs,


Tuesday, November 18, 2014

Welcome to #24 of Creative Colors Challenge

Hello and happy Tuesday friends!  Today I am coming to you with a sweet little card that I've made for the Creative Colors Challenge # 24. The colors this time around are right up my alley and it was super fun coloring this image up. Have a look at what I have come up with

Thank You


Recipe:

Paper: PTI White, SU Certainly Celery, Bazzill green, DP Prima Lyric, peach colored vellum

Image: Aurora Wings Rose Corner 2

Inks: VersaFine Onyx Black, SU Mellow Moss, Copics, Wink of Stella pen

Accessories: peach colored lace, seam binding, jewelry piece, handmade resin butterfly with rhinestone accents, Spellbinders Labels 14, Labels 5, Decorative Labels 22

Size: 5.5" x 5.5"

What do you think? I just love the way it came out, have a look at the inspiration picture


    Use the four colors from the color blocks on the bottom of the picture PLUS us an envelope on your card

Our sponsor for this weeks challenge is Aurora Wings


and this is the fabulous image I've used


I hope I was able to inspire you. To see what the rest of the girls have come up with, make sure you check out

Archana   *   Claudia   *   Kim   *   Martha   *   Neha   *   Tanvi   *   Tereese

these girls never cease to amaze me!

Well, this is it for me for today. I hope that you will find some time to play along. To see all of the details for this challenge make sure you'll check out the Creative Colors Challenge Blog.

I am adding this card in the following challenges:

Aurora Wings challenge #9   Anything Goes

Doodle Pantry #52   Any digi goes

Thanks so much for stopping by, I truly appreciate it!

Have a happy crafty day!

Hugs,


Tuesday, November 11, 2014

Welcome to Creative Colors Challenge #23


Hello and welcome to a new Creative Colors Challenge! Before I go into all the details of what I have come up with I would like to wish all of my fellow US friends a happy Veterans Day!  Thank you to all that are serving in the military now and have served in the past, including my husband who served the in the US Air Force for 26 years!  It is because of your bravery that we get to enjoy our freedom, so thank you to all!

Alright, let me get to the challenge now and what I have come up with.


Recipe:

Paper:  PTI Vintage Cream, Ripe Avocado, DP BoBunny Country Garden Collection.

Image: SamiStamps   Bird on Branch

Inks: Memento Rich Cocoa, Tim Holtz Distressing Ink Tea Dye, Vintage Photo, Copics

Accessories: Spellbinders Labels 4, Labels 3, Decorative Labels 34, WOC hip rose buds, Crafty City flowers, Recollections flowers, Prima burlap leaves, pearl pick, lace, homemade shimmer spray, eyelash trim, sentiment stamp by ODBD from the Sentiment Collection 2

Size: 5.5" x 5.5"

And here is the inspiration photo


Colors to use  Yellow   *   Green   *   Brown   * PLUS more than 2 layers


And our wonderful sponsor for this weeks challenge is


Well, isn't this a fun color combo? I hope I was able to inspire you with my card, but please also check out what the rest of the Design Team has come up with by visiting

Archana   *   Claudia   *   Kim   *   Martha   *   Neha   *   Tanvi   * Tereese

For all of the details to this wonderful challenge make sure you'll check out the Creative Colors Challenge Blog.

Well, this is it for me for today!  Thanks so much for stopping by, it means a lot to me!

Have a happy crafty day!

Hugs,

Saturday, November 1, 2014

Welcome to the Our Daily Bread Designs November Release!

Hello and welcome to the Our Daily Bread Designs November Release!  WOW, can you believe it is November already? Well, with Christmas right around the corner this release is all about Christmas with some amazing stamps, new custom dies and even two, yes, two new paper collections. There is for sure something for everyone in this release!  So, without further ado let me get started with my first card

Shine On


Recipe: 

Paper: Vintage Cream, Deep Red, Spring Rain, DP Christmas Paper Collection 2014

Stamps: ODBD Shine On

Inks: Versa Fine Onyx Black, Ocean Blue, Palette Moulin Rouge, Ranger Adirondack Denim

Accessories: ODBD Custom Vintage Flourish Pattern, Vintage labels, Sparkling Stars, silver Venise lace, rhinestones in different sizes, homemade Shimmer spray

Size: 4.25" x 5.5"


So, what do you think about this one?  This one is even flat enough to send in a regular envelope, perfect to keep the cost of shipping low.

On to my second card


Merry Christmas


Recipe:

Paper:  Copper Metallic, Vintage Cream, Fine Linen, DP ODBD Winter Collection

Stamps: ODBD Shine On, Poinsettia Wreath (November 2013)

Inks: Versa Mark, Tim Holtz Distressing Ink Tea Dye, Ranger Queens Gold Detail embossing powder

Accessories: ODBD Custom Dies  Doily, Vintage Labels, Antique Labels and Border, Beautiful Borders, Sparkling Stars, flat back pearls


That is my second card. I hope I was able to inspire you with my creations today, but if you need some more inspiration, please head on over and see what the rest of the Bread Sticks have come up with

Chris * Lori * Paula * Cathy * Dawn * Sandee * Julie * Angie * Lisa * Wanda * Grace Silke
AudreyGraciellie (Guest Designer)


But wait what would a new release be without some awesome prizes


Three randomly selected winners will each receive a $15 gift certificate to the ODBD Store, to be used toward the purchase of ODBD Stamps found in the "stamps column" of the website just for commenting on the Design Team cards!  You have until November 2, 2014 at 9:00 p.m. EST to leave your comments on the Designers Blogs for a chance to win!  The Winners will be posted on the ODBD Blog on November 3rd, so be sure to check back there to see if you won!

Now have fun and hop to all of the ladies, you would not want to miss what they have come up with!  If for any reason there are any hick ups during your hopping, please go directly to the ODBD Blog where any problems should be fixed first!

Well, this is it for me. Today I get to meet Kelley and Rick in person and get to experience all of the people that ohhh and ahhh over the wonderful ODBD stamps, dies and paper collections. Kelley and Rick are at the Mesa, Arizona Rubber Stamp Events show, so if you are in the area, come on by and say hello!

Have a blessed weekend!

Hugs,


l